Showing posts with label Russian. Show all posts

Tuesday, December 21, 2010

Russian VIII Corps in 6mm, Part 2

...In which our protagonist, conscious of his many shortcomings as a blogger, nonetheless begins what will doubtlessly be a brief and feeble comeback, and shows off his Russian 27th Division for Borodino.

Odessa and Vilna infantry regiments. These regiments weren't actually brigaded together, but I mixed the pairings up somewhere along the way. Crap. Kind of shows how my hobby activities have been going, recently.


Yes, it's been a long time since I've last posted-- an observation which begins all too many of these blog posts, it seems. I sincerely regret that, and I apologize to anyone (if there is indeed anyone) who has ever hoped for more frequent updates from yours truly. I wish I could oblige you! The current dilatory schedule of posts is distressing to me as well.

Another view of the Odessa and Vilna regiments. The Odessa reg't should properly be brigaded with the Tarnopol reg't, and Vilna with Simbirsk. In any case, the NCO brandishing his sword is a favourite sculpt of mine, from Adler's early Russian Napoleonic musketeer command (RA 10A).


In fact, I'm so distressed that I've decided to turn over a new leaf, starting with this post. Don't get too excited; I'm not going to promise that I'll post more often, or anything like that. Nor will I even promise to maintain the high standards of photography, reviewing, and helpful hobby-related articles that I (sometimes) feel like I've upheld thus far. That's right, fickle reader: for the immediate future I'm actually promising a drop in quality. Don't like it? Tough! It's the only way you're going to get any posts at all!

The 3rd brigade of the division, consisting of the 49th and 50th Jäger regiments. For some reason that currently eludes me, this brigade was commanded during the battle by Colonel Voyeikov of the Life Guard Preobrazhenskii regiment. Apparently I've been off my Borodino kick for too long to remember these things.


Wasn't this post supposed to be about Russians?

Right, Russians. Today's subject is the Russian 27th Division, yet another element of the VIII Corps which has been in the works for far too long. Commanded by Major General Dmitri Neverovsky, the 27th had been heavily committed during the fighting around Smolensk and the subsequent retreat. Having sustained heavy losses, the division was appended to the VIII Infantry Corps for Borodino, which consequently became the only Russian corps at the battle to consist of three divisions.

Adler RN 4B - "Militia, musket, advancing". Fairly generic looking, wearing trousers, coat and some sort of fur cap. Only one pose means that Opolchenye units will look rather uniform unless painted differently.


Since the 27th had suffered the heaviest casualties of any of the Russian divisions prior to Borodino, I wanted to do something special to show this. Reducing the number of figures in each of the component units would have saved me too much time, effort and money, so of course I didn't do that. Instead, I opted to fill out the second rank of each regiment with militia-- a practice that became common in Russian units later on in the war, as attrition thinned the ranks. For Borodino it's probably anachronistic, but that didn't stop me.

3rd brigade again. I've whined before on how much space the 'advancing' posture takes, and how difficult that makes it to cram bunches of them onto bases. The lovely hay cart is produced by Irregular Miniatures, purveyors of all sorts of scenic goodies, any and all of which can be obtained through the ever-helpful Angel Barracks.


Apparently, our Protagonist can't count. 

Yes, it's sad but true. Simple mathematical tasks like multiplication and division seem to cause especial problems. Take for instance my attempt to populate the second rank of each of these formations with militiamen: in order to make it look good, I figured at least half of each of the ranks in question should consist of militia. Easy, right? Nine men per rank means five militia per, times three bases equals... well, that equals fifteen, which, since they come in strips of four, is actually one less than I bought for the task.

Tarnopol and Simbirsk infantry regiments. The militia populating the second rank of each regiment can be seen clearly (well, aside from their rather nondescript paint jobs, that is!).


Of course the astute among you will have noticed before now that there are two regiments per base, and that means two second ranks for each one. The very astute among you will have realized that this in turn means thirty militia men would be required to meet my condition of "at least half" of each rear rank. Thirty, not fifteen (or sixteen, as explained above). Way to go, Mike.

Tarnopol and Simbirsk regiments. Again, this isn't a proper brigade, since I misread which regiments were brigaded with which. Not only can I not count, but evidently my literacy skills are in question these days as well!


Anyway, that's the Russian 27th Division complete. It doesn't quite finish the VIII Corps, as there's still another grenadier division, artillery and command to do... which I'm not going to promise anytime soon.

More of an eye level view.


Next time: part of the long-awaited Württemberg division (Württembourgoisie? Württembergers? Our protagonist doesn't know, but he likes them anyway).

Also, a special shout out to David F. I have no idea who you are, but apparently you became a follower of Mike's Leadpile while I was writing this! Man, it takes me a long time to write these things...

Saturday, April 17, 2010

The Art of Small Soldiery: Putting 6mm into Perspective

...In which our protagonist attempts to show how little 6mm figures actually are.

I can't claim any credit for the battery idea. If there's anything that's recognizable all over the world and always the same size, it's batteries-- and far wiser people than I realized this a long time ago.

Admittedly, I've generally avoided dwelling on how big (or little) the figures I'm working with actually are. Instead of drawing attention to the toy soldiers themselves, my focus has gradually shifted towards what those toy soldiers are meant to represent, to make that mini look like the real soldier might have, and the miniature army look like a real one.

For a while now I've been using the Canadian penny to show how big figures are. Of course, out of the six-and-some-odd billion people on the planet, only a miniscule fraction actually know how big these things are...

In my current Borodino project, I've taken this philosophy even further, trying to take advantage of the excellent Adler miniatures to give the impression of movement and action. I've tried to make every base a vignette, and tried to highlight that dynamism in my photography. Heck, my most poplular posts recently have probably been the massed army shots, where I've employed every last bit of 6mm scenery in my feeble collection to try and bring the scene to life for the viewer.

Headphones make really big speakers for really little men. I mean really big speakers. It kind of reminds me of that scene from Apocalypse Now... except there are no helicopters, no napalm in the morning, and this is not Charlie's Point.


But what if I took a step back? What if, for just this one post, I really went and concentrated on the toys, rather than the soldiers? I mean, I can do my very best to make them look big and real, but the fact remains that they are pretty damn small. And really, that's the remarkable thing, isn't it?

So how do I go about showing the Liliputian marvellousness of what is perhaps my finest batch of toys? Attempting to accurately convey a sense of scale has been one of the eternal difficulties for figure painters. In this case, anyone who has painted 6mm figs will of course have a good idea of how big they are, but what about gamers and painters who deal exclusively with 15mm, or 20mm, or the gargantuan 28mm?

Bon Appetit! Plates, unfortunately, come in all sorts of sizes. This one happens to be quite small, which makes the little fellas look a great deal larger than they actually are.


And so I concocted this series of pictures: 6mm Napoleonics shown alongside everyday items. Neat, huh?

...Okay, so it's pretty lame. I'll concede that much. But you're not paying anything to see this, so don't complain.

Talk about a crappy site for a battery! Ha ha ha! ...Yeah, I guess I'm not quite ready to quit my day job to become a stand-up comedian. Also worth noting: I did not bring any miniatures into the bathroom for this. These are fresh, unsullied rolls that have never been within 10 metres of a toilet.

This would've been a good shot if it was in focus. I suppose I could have taken another picture, but let's be serious here: in this day and age, you just take 10 shots all at the same time, and if none of them turn out, this is what you get. Deal with it.


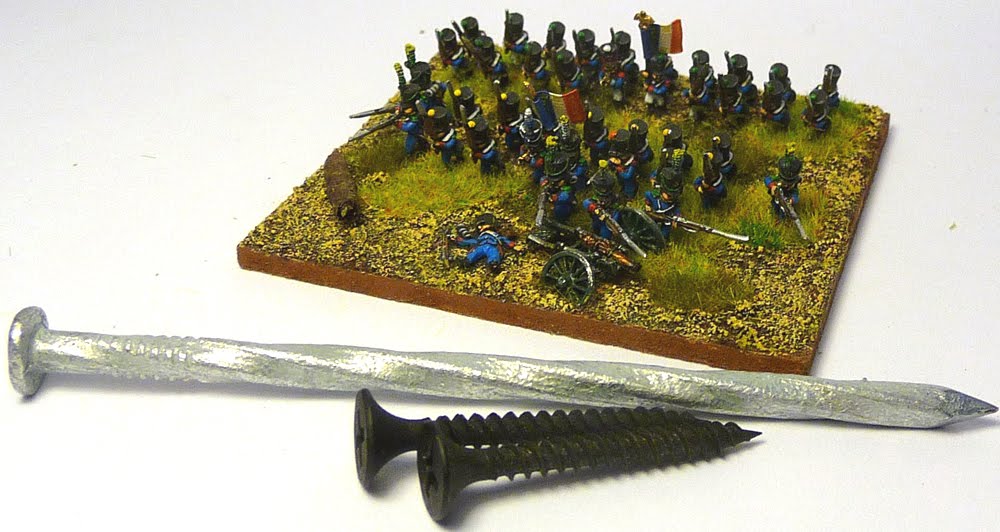
Funny story about this one. Well, actually it's no funnier than the rest of this post, but I'm still gonna tell it. Anyways, I've been renovating my basement recently. Eventually I hope to build a nice little hobby area down there (among other "more important" things, whatever those are), but in the meantime it's all just a lot of dust, swearing, and sharp and/or dirty stuff that generally succeeds in destroying clothing and not doing much else. I've got lots of tools and whatnot, including a greatly under-used carpenter's apron that generally seems to end up in the least accessible part of the room. Consequently, I keep stuffing my pockets full of nails and screws whenever I'm using them, and when I come up at the end of the day to change, I almost invariably discover myself trailing leftovers all over the bedroom. Nails and screws do, however, make good objects of comparison in this sort of situation.

Also, you could probably make some pretty nice 6mm poplar trees if you flocked some screws.

Not such a good picture here. From a technical standpoint, it's in poor focus. Aesthetically, the horsemen should be riding towards the centre of the picture to make a more satisfying image. And rhetorically, the unfortunate choice of background suggests that A Military History and Atlas of the Napoleonic Wars is available on CD, which, to the best of my knowledge, it is not.

Another good idea let down by faulty execution. With all the blurry pictures in this set, I must have drank too much coffee beforehand. Or more likely it was the hours of hammering studwalls together in the basement-- hard on the nerves. But hey: at least it's a good poker hand!

A portrait of the Artist as a Brobdinagian

Next time: more Russians. And I really mean it this time.

Monday, April 12, 2010

Russian VIII Corps in 6mm, Part 1

...In which our protagonist, for reasons of throroughness rather than necessity, shows off some more old stuff, in this case the Russian 2nd Grenadier Division.

Colonel Shatilov's 1st Brigade, comprising the Kiev Grenadiers to the fore, followed by the Moscow Grenadiers.

Most of my Borodino-in-6mm efforts so far have centred around the French/Allied army. There are a couple of reasons for this; for one thing I've simply painted a lot more of the Allies, but for another, the Allies are simply so much more photogenic.

The problem is (and yes, once again I'm going to rant about the so-called problems I have with this project, despite the fact that I've done so many times already, and despite the fact that I have no one to blame for starting it but myself. But anyway), the Russians are saddled with the twin disadvantages of 1) having very dark uniforms, and 2) not having much by way of differences in uniforms.

A ground-level view of the 1st Brigade. I've compained before how the Russian NCOs that come with the infantry command strips are generally in pretty boring poses, but I should mention that the mounted officers, by contrast, allow for some interesting possibilities.

I'll admit dark green isn't a terrible colour in of itself. Heck, it's probably my favourite colour, and maybe what drew me to the Russians in the first place. But paint the coat on a 6mm figure dark green, and hold it at arm's length, and you begin to see... well, not a lot, admittedly. Dark green makes for pretty good camouflage at life-sized, let alone in 6mm. I've even had people browsing through the uniform plates in my copy of F.G. Hourtoulle's Borodino: The Moskova (a book that's forever underfoot hereabouts) comment on how the Russian uniforms "make more sense". Now, I've tried explaining how this viewpoint is largely anachronistic; at a time when most soldiers were armed with smoothbore muskets and generally closed to 50m or so before shooting (when they even bothered to shoot, instead of going straight to the bayonet), the camouflage value of one's coat was not such an issue. Well it was, but looking good was more of an issue.

Colonel Buxhöwden's 2nd Brigade. Alex Mikaberidze, in his The Battle of Borodino: Napoleon Against Kutuzov, spells Buxhöwden with an "ö"; consequently, I have no idea how to pronounce it. Pronunciation notwithstanding, the group with the orange flags is the Astrakhan Grenadier Regiment, followed by the Fanagoria Grenadiers with their pink-and-green.

Anyways, there's not much you can do about dark green. If you try brightening it up, it looks "wrong" for Russians; if you leave it dark, the damn Russkies start to disappear.

As for the complementary problem, namely the Russians' identical uniforms, there are steps that can be taken. I mean, no one wants their grenadier regiments to be confused with mere line, after all. But what's that, you say? You can tell which are grenadiers because they have big tall plumes on their shakos? And those plumes are... oh, yes, that's right, they're black. Just the hue to stand out against a background of dark green coats.

The 2nd Brigade, showing some experimentation with the rear formation. Mixing poses, I tried to make it look like the Fanagoria grenadiers are breaking from march-attack into a bayonet charge. I might try this again some time with the French, where the greater variety of poses would allow for more intermediate steps between muskets carried horizontally and vertically.

I opted for a different approach. I've complained before (can you believe it?) about how Adler's Russian infantry command strips only come with one standard bearer, whereas they should have two. This oversight, combined with my general cheapness-and-laziness, led me to build all my line infantry regiments with only one flag apiece. This of course left me with a golden opportunity: I could give my grenadier regiments two flags each!

Colonel Levin's 3rd Brigade, with the Siberia and Malorossiiskii (or Little Russia) Grenadier Regiments.

Doubling the flag count for the grenadiers meant making an exception to my usual cheapness-and-laziness, and furthermore led to an unfortunate surplus of already-underutilized drummers and NCOs. But who am I kidding? It was worth it-- after all, in a very drab-looking army, these brigades have twice as many colours as the rest! (Ba-dum ching: Napoleonic joke in poor taste.)

The 3rd Brigade from the anterior side (honestly, who says 'anterior'?). Astute readers might recognize this base from my basing by numbers post from way back in November!

So that's Major General Karl von Mecklenburg-Schwerin's 2nd Grenadier Division, as well as my quota of whining for... well, probably that's enough whining for this year. I'm still going to whine in my next post though. Also all the ones after that.

Next time: more Russians. Or not. We'll see.

Saturday, November 21, 2009

Basing by numbers

...In which our protagonist gives a step-by-step look at his ridiculously-complicated basing method.

I'm going to show how I make a simple vignette, in this case a base with some troops wading through a puddle, like the one shown above.

Basing. It's another one of those aspects of a great looking army that wargamers either love or (more likely) hate. From the pioneering days of green paint to the the modern age of artificial foliage, it's been a long struggle to balance between the quick and easy, versus the great looking, and again versus the realistic.

My own style has verged decidedly away from the quick and easy, at least for the current 6mm Borodino project-- so don't try it if you haven't got a lot of patience! And remember: I'm not plugging this as the best way to base your figures; it's simply a way, and not even necessarily a good one.

Step 1: you need something to base your troops on.

Well, actually step 1 would be getting troops and painting them; in this case I've already got some painted ones standing by. Anyways, being too lazy (not to mention too inaccurate) to cut my own bases, I much prefer to buy mine. In this case I'm using an excellent pre-cut 60 x 60x 2.5mm MDF square from East Riding Miniatures. Different media have their pros and cons; MDF bases are cheap, fairly durable, and thick enough that you can grab them directly, rather than using the figures for leverage and consequently ending up with an army full of spaghetti spears. On the other hand, MDF is not magnetic, and it swells and warps when wet-- so don't spill your beer.

Step 2: figure out where your troops are going to go.

This means getting out your ruler and sketching some guidelines. Yes, a lot of wargamers are too impatient to bother with such things... and it tends to show. It's worth taking the extra couple of minutes to do this, even if you're using figures cast in strips (granted in that case you don't need to worry about spacing, only alignment).

Step 3: etch and sketch.

The surface of most bases is going to be pretty smooth, which is not ideal for creating a strong bond. If you're planning to use sand, flock, or anything granular as texturing, you will definitely want to roughen the surface before getting out the glue. In this case I've scuffed it using a coarse sandpaper.

Note, however, that I didn't scuff everywhere. Since this base is going to have a puddle on it (which I've sketched in), and since the puddle won't be taking any texturing, I've left it smooth. The two Xs you see in the grid mark where the standard bearers will go in that formation, which is important when it comes to identifying victims for the next step.

Step 4: down and dirty.

Looking at the layout grid for the base, you can see that three soldiers are going to end up with their feet in the muck. Muck, of course, is not generally kind to white uniforms, so out comes the brown wash. Three unlucky Russian grenadiers get their gaiters spattered, and then go in for a bit of amputation!


Out come the side clippers to cut the base off each of the figures, and the needle file to flatten the botttom of the cuts. I've also decided to have a partially-submerged log floating in the puddle, so I've also done some surgery on a twig.

Step 5: stuck in.

At long last, I've finally gotten out the glue. I told you my way was long and absurdly complicated! Most wargamers would probably be done the entire base in less than five steps. In any case, I've used gel superglue to stick my three amputees in place, one at a time, along with the protruding bit of wood. As I glue each figure, I prop them in place while the glue dries. You don't want your grenadiers stuck on there leaning at 45 degrees! Once everything's in place, I brush on some PVA glue to strengthen the join.

Now wait for the glue to dry.

Step 6: work that murk!

Because a single stage would be entirely too quick and easy, I do the water in several layers. First, I paint the puddle green. This represents... algae. Yeah, that's it. Hey, I never said any of this made sense: it just happens to be what I do.

Now wait for the paint to dry.

Over top of the green goes a coat of watered-down brown ink. Since the forward regiment on this base will have already marched through the puddle, I've drawn "ripples" in the brown ink with a wet paintbrush, letting part of the green undercoat show through. Finally, a thick layer of glossy varnish gives the water a distinct shine. Note that I've also glued on a scrap of bark, which will in due time become a boulder.

Remember to wait for each layer to dry before brushing on the next one!

Step 7: everything at once is too much.

Have I mentioned how absurdly long my basing method takes? By this point you should be starting to see why. In this stage I've glued on the front rank of each regiment. Why the front, and not the back, or both? Well, since the grenadiers I'm using are all in an "advancing" pose, the space between the ranks is pretty much inaccessible once all the troops are glued in place. By sticking only the front rank on first, I can deal with the "in between" space without having to worry about anyone's bayonette being in the way. If I were using minis in standing/marching poses, I would definitely glue everything on at once.

...And wait for the glue to dry.

You can also see that I've started to apply my texturing medium, in this case good ol' terrarium sand, stuck on there with undiluted PVA. A lot of people dilute their PVA with water-- a waste of time, in my opinion. The stuff is dirt cheap, spreads nicely enough without being watered down, and dries twice as quickly to boot. And believe me, when you're doing as many steps as I am, drying twice as quickly saves a lot of waiting! Notice, though, that I've been careful not to apply any sand where the other ranks are going to be.

Now wait--again--for the glue to dry.

Step 8: you put three layers of sand?

Yes. Three. Again, this is something a lot of people are going to say is pointless: a bit of static grass will easily cover up the "step" between a single layer of sand and the thick figure bases. Even those who like a flush base will frequently go with some sort of pumice. In my defense, I have only couple of points: firstly, that a single layer of sand will tend to deteriorate from day-to-day handling, whereas the three-layer method simply wears down to the next layer of sand (and for that matter it has so much hardened glue in it that it's much less likely to wear away). Secondly, pumice is comparatively expensive, and a careless brush coated with the stuff will leave white smears all over the place. Sand and PVA, by contrast, cost next to nothing, and the glue dries clear if you get any where it shouldn't be.

Of course, you do have to wait three times for the glue to dry.

Also note that I've capped off the three layers of sand with a dark brown wash. Again, for anyone who cares and who didn't already know, I'm using the Baccus Basing System (with a few minor tweaks of my own).

Step 9: the middle ground.

This is an easy one-- just drybrush the ground between the ranks to suit your usual "ground" look.

(And wait for the paint to dry!)

Step 10: double the fun!

Now, at long last, I glue on the second rank of figures. And wait for the glue to dry. For the sake of interest I like to my my ranks a bit of variation, so here the line is straggling a little bit where it's gone through the puddle.

It might seem like a preposterous amount of waiting to get to this point-- but notice that each of the steps to get here takes only a couple of minutes (well, aside from painting the figures). The trick is to plan around the waiting. For instance, I'll generally do two or three bases at once, working on them for twenty minutes or so in the morning, and again in the evening. Depending on your schedule, you might even be able to do three coats of PVA in a day. Painting is similarly handled-- because I know I'm only going to base one rank at a time, I don't even paint the second rank until I've already started glueing on the sand.

And waiting for that glue to dry.

Step 11: touches and textures.

At long last the base is starting to look good. Here, after the long wait for the glue holding on three more coats of sand to dry and make everything flush, I've drybrushed the ground to bring out the texture. For the sake of a better photo I've drybrushed everything; realistically, this is when I'd decide (more or less) where the static grass is going to go. Obviously, any ground that will be covered with ground doesn't need to be drybrushed.

That scrap of bark I stuck on there also gets its own drybrushing, in this case a medium grey followed by a light grey. When that's dry, a inking with watered-down black brings out the surface details, and you've got yourself a boulder. Finally, I paint the base edges to cover up any messiness from the previous stages.

...And wait for everything to dry.

Step 12: it's alive!

At long last we come to the fake foliage stage. I outlined in a previous post the materials and methodology I use for this. One thing worth repeating is that bases seem to look better when they have a "dominant" type of foliage. In the picture above you can see the bright yellow-greenish mix I've been using in this role; the pic below shows the final result, with other grass mixes and some flocking added. Of course, every different type of foliage you add means having to wait for the glue to dry!

So, after all that it's finally time to give the base a last once-over to make sure everything's the way it should be, followed by a helpful squirt of varnish to keep it that way.

I pronounce this base ready for the gaming table!

...and it's off to join its grenadier division.


For anyone who lost count, I waited five times for superglue to dry, seven times for PVA, a good six or seven times for paint and/or ink, and twice for varnish! I'm surprised the grass didn't end up longer...

Tuesday, September 22, 2009

From Russia With Love

...Or, how our protagonist finally manages to complete a major Russian formation for Borodino (and muses on why it took so ridiculously long).

Raievski's 7th Corps advances... cue the 1812 Overture.

Once again it's been nearly a month since I've posted, and once again it seems as if I've accomplished all too little over those weeks. True, I've now finished the Russian 7th Corps... but it's a small corps and a month ago I was a good two thirds of the way there already. If the Russian command had been this slow in 1812, Napoleon might have had an easier time of it.

Divide and Conquer

Having already flaunted the 12th Division in my last post, I've only got a single new one to show off now. This is the 26th Division, and like its counterpart, it comprises four regiments of line, and two of Jägers.

The Ladoga and Novgorod regiments. Again, the scenic possibilities of individually-based Adler miniatures is, I think, obvious.

My previous basing experiment with the French troops wading through a puddle turned out so nicely that I decided to repeat it with some Russians. Now, the bases I've been using are higher-quality MDF, with has a comparatively slick surface. Anyone who's used this stuff probably knows that glue doesn't adhere very well unless the base is scuffed a little, and indeed, I keep a bit of coarse sandpaper with my basing supples for that purpose. Naturally, being the careless fool that I am, I roughed up the area I'd set aside for the 'puddle', and as a result didn't quite end up with the same smoothe glossy surface I'd achieved with the French. Another lesson learned the hard way, I suppose.

Adler RN 20A - "Comd group, kiwer (3)". I've complained previously about how this code comes with only one standard bearer when it should have two. I'd also like to complain about the sedate pose of the officer-- sometimes you really just want one pointing with his sword.

One of the reasons I've made such slow progress with this project has been my tendency to paint more minis than I have room for on each base. The command figures are a case in point: in the entire Corps I only used five drummers, when I'd planned to use a dozen. Granted, this means that I've accumulated a fair stockpile of painted bits and bobs for the future, but I certainly intend to be more economical with my painting time as well.

The 5th and 42nd Jäger regiments. The lack of colours makes these guys much easier to distinguish at a distance than their French counterparts, although I may add more scenic elements to future Jäger bases to make them a bit more visually interesting.

One of the problems I've had with the Russian light infantry regiments especially is a lack of space. While the French lights come in a 'high porte' pose that frees up some real estate ahead of each formation, the Russians have no such luck. As a result, some of the skirmishers up front look like they're about a step away from getting bayonetted in the back. One solution, I suppose, would be to replace one (or both) of the Jäger regiments with figures in 'march attack' pose, i.e. with musket shouldered. The main problem with this is that I've already got far more minis than I need in the advancing pose! Some of them, I suspect, may find themselves painted as grenadiers one of these days...

The 26th Division in all its 6mm glory!

It doesn't matter if you're black or... green?

Russian uniform colours continue to remain something of a mystery to me. Most people seem to agree that their coats were green, but just how green is a matter of contention. Even in period paintings the coats can sometimes appear so dark as to be almost black, while at other times looking considerably lighter. Probably the best explanation I've heard argued is that green dyes were more prone than most to bleaching, and so a coat that began quite dark would gradually become more and more green.

The regiments from Poltava and Orel.

Then there's the pompoms. There is, apparently, some system for explaining their colour... but I have no idea what it is. In a couple of spots I've found what I think is a complete explanation, only to find illustrations depicting pompoms whose colour is explained nowhere. Happily, I'm quite willing to plough on in ignorance, painting pompoms whatever colour I damned well please.

A better view of the base, showing the standard bearer of the Orel regiment standing on a boulder, and having a chat with the mounted officer.

Finally there's the flags. Here, at least, there seems to be a coherent (if complicated) system. Only the four line regiments in each infantry division carry flags, and each of them gets different coloured flagstaves: white, yellow, brown or black, depending on their position in the formation. Each battalion of each regiment carries two flags: either one 'coloured' flag and one 'white' (or 'colonel's') for the first battalion, or two identical 'coloured' flags for the rest. A new flag design seems to have been created every few years, but whether or not any given formation carried the flag for any given year seems to have depended on any number of factors-- the unit's seniority, its battle honours, the Tsar's whim, etc.

Take me to your leader

An army corps needs a corps commander, naturally enough. The Russian 7th Corps was commanded by one Nikolai Nicolaievitch Raievski, dubbed by his countrymen the "Hero of Borodino". It was Raievski's corps who held the Great Redoubt, and who, for most of the battle, held it against several times their number of enemy troops (incidentally, two whole regiments were reputedly slaughtered to a man when the redoubt was taken).

A general of infantry. As usual, I had a hard time fitting everything I wanted to on the base.

With a general as renowned as Raievski to depict, I wish I could say I used a special figure. Alas, I did not. Adler offers a Russian generals pack with specific figures for a number of historical commanders, but it's quite the expensive collection of metal, as these things go. Someday, I'll get myself one... but not this day. Anyway, not only did I not use a specific Raievski figure, but I actually used an Austrian general. The Russian command strips I had contained a general in bicorne and an ADC in a kiwer; since I wanted a couple of bicorne-wearing generals, I snuck in the foreigner. In my defence, the Russian army of the day did employ quite a lot of mercenary officers.

Adler RN 2C - "Musketeer, kiwer, marching". The shako cords (kiwer cords?) on this code were not very pronounced. Whether this was because of unusually-poor sculpting or worn out molds, I don't know. In any case, all my attempts to paint the cords ended disastrously.

Of horse I love you

At long last, I also had a chance to check out some of the legendary Adler cavalry. Yes, they're considerably larger than any other 6mm horse-- and in point of fact the riders themselves scale poorly even compared to Adler's own infantry! However, despite many claims to the contrary, they are considerably smaller than even the smallest of 10mm cavalry.

Adler RNC 1B - "Hussar,slung Pelisse, kiwer". Amazing sculpting, although casting is hit and miss. I had one rider come with a broken sword.

As always, the added size of the Adler figs is used to good effect. The level of detail and dynamism shown in these models is exquisite-- when allowing for their scale, the hussars I painted have to be the best sculpts I have ever seen. Bar none. I only wish my painting was up to the same standards!

Adler RNC 2A - "Hussar, wearing Pelisse,kiwer". A little harder to identify as hussars from a distance, but easily mixed with their "slung Pelisse" counterparts for variety.

The added size of the cavalry also poses issues for basing. The Baccus standard is nine horsemen abreast for 60mm frontage; you'd have a difficult time matching this with Adlers. In my experience eight abreast would fit comfortably (7.5mm frontage per figure), while I opted for seven across, in keeping with my philosophy for this project of not sticking figures too close to the base edges.

The Achtirka Hussars. Their yellow-on-brown uniform is possibly the ugliest of all the Russian cavalry.

Other differences between manufacturers are also worth noting: while Baccus cavalry tend to be weak at the horses' ankles, the Adlers have no such weakness. On the other hand, the uplifted sabres of so many Adler codes are a definite weak spot. A few bent blades should be expected from careless handling, while I shudder at the thought of what a dropped base might do.

Adler RNC 10A - "Hussar, kiwer cmd". The cornet is nice, but the Russian hussars carried no flag as far as I've been able to determine. Oh well.

A Grand Battery

I also took a first crack at some artillery. The guns themselves were, if anything, the best of the lot. Not only is the sculpting up to the usual high standard, but I found the castings very crisp, lacking the excessive flash that made cleaning everything else such a chore.

Adler RNE 2 - "6 pdr". You can cue the 1812 Overture again.

The wheels are separate castings, and the same wheels are used for all the artillery I've seen, both French and Russian alike. The wheels are also very nicely cast, far better than many I've seen in larger scales. Although I've had a few come with flash clogging the spokes, Adler usually sends a few extra wheels along to ensure sufficient good ones-- a practice I wish other miniature manufacturers would emulate!

A battery of 6-pounders. Since one of the artillery crew is hefting a cannonball, I made the mistake of sticking him directly in front of the barrel on one of these bases. It looks pretty silly, and I shan't do it again.

The Russian artillery arm was in some ways the pride of their army. Throughout the period, Russian armies showed a marked tendency to dig in before a fight, shielding their batteries behind earthwork fortifications. Borodino was no exception to this, with Russian cannons occupying not only Raievski's Great Redoubt, but the three "Bagration flèches" as well. Since I figure I'll build myself some scenery for this project at some point, I refrained from depicting any kind of earthworks on the artillery bases themselves.

Adler RN 19A - "Artillery line crew". I'm not sure what the fellow on the left is supposed to be doing, but once again I found myself wishing for somebody pointing a sword.

Several thousand words worth of pictures

We now come to the part of the post where I shut up and let my camera do the talking ;)


So that's the Russian 7th Corps. It's not very big-- and I don't just say that because it's in 6mm. This would have been a formation of around 14,000 men, which, as I'm sure you'll agree, is not much more than scratching the surface of the 250,000-ish at Borodino. I've got a long way to go!

Next up, the French 1st Corps. Hopefully it won't take another month this time.